
How to Make a Hydrangea Flower Ring
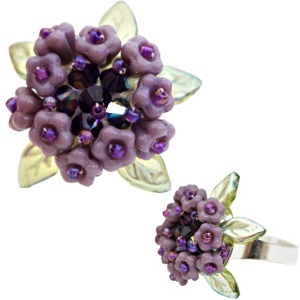
Hydrangeas are one of my favourite plants, I love the fact that the flowers are made up of lots of individual florets.
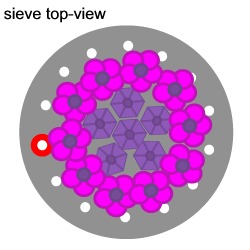
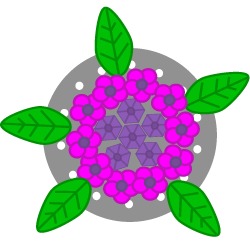
When we received a shipment of adjustable sieve ring blanks I was inspired to create a hydrangea flower in a ring using Baby Bell flowers and 4mm Swarovski crystals.
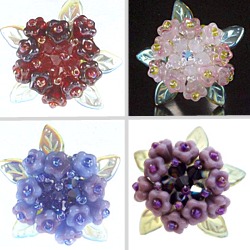
I got so carried away I made four in different colours.
To make this Hydrangea flower ring you will need:
- 10 6mm Baby Bell Flowers
- 6 Swarvoski 4mm crystals
- 5 Olivine 10mm Small Leaves (AB)
- 27 Toho Seed Beads (size 11)
- 15 Toho Seed beads (size 8)
- 2m of Fireline Braided Bead Thread Crystal Size D 6lb
- 1 Size 10 beading needle
- 1 16mm Adjustable Sieve Ring Blank(Silver Plated)
- Chain nose pliers (for attaching the ring back to the sieve)
If you are not sure what any of these items are please have a look through our jewellery making glossary.
Hints and Tips
I use the longest length of thread I can manage when doing beadwork because it means I don't have to add in a new piece of thread.
I measure the thread I need by using the length of my arm. My arm is about 2.5 foot long. To get 7.5 ft of thread I measure 3 arm lengths by holding the thread in my hand, measuring to my shoulder, moving the bit at my shoulder to my hand and measuring to my shoulder again. I do this 3 times.
Power pro and Fireline are pre conditioned threads that do not need waxing. However if you are using a different size D beading thread you may need to condition it with wax or Thread Heaven.
If you have trouble threading the needle , it can help to flatten the ends of the thread between your finger and thumb nail or with a pair of chain nose pliers.
Instructions
Step 1
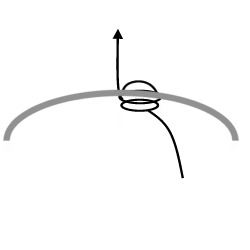
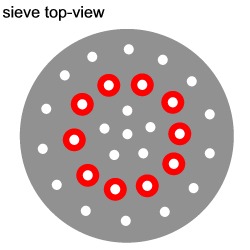
Cut about 2m, or 2 arm lengths, of fireline and thread on your needle (see above).
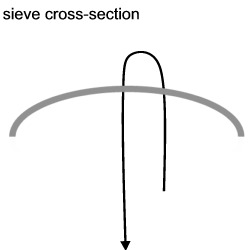
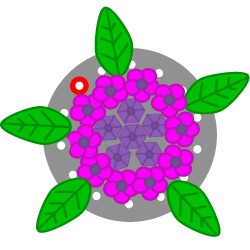
Bring your needle up through one of the holes near the centre of the sieve and then down through a hole next to it. It doesn't really matter which hole, this is just to secure the thread to the sieve. Leave a short tail of about 7cm.
Step 2
On the back of the sieve knot the two ends of the thread together securely.
Step 3
Bring the thread up through the centre hole.
Step 4
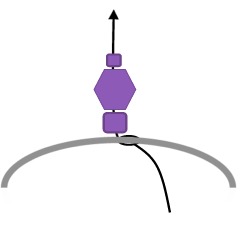
Thread on:
- 1 size 8 seed bead
- 1 4mm Swarovski Bicone
- 1 size 11 seed bead
Step 5
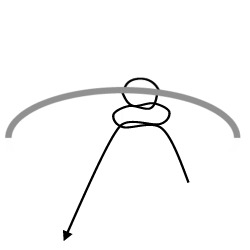
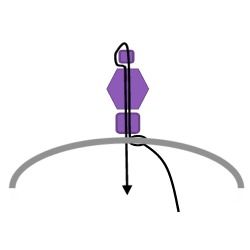
Missing out the size 11 seed bead, take the thread back down through the Swarovski bicone, through the size 8 seed bead and down through the same hole.
Step 6
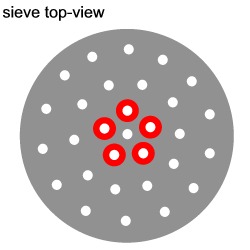
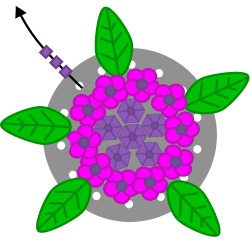
Add 5 more sets of seed beads and Swarovski bicones in the same way.
Add them to the 5 holes surrounding the Swarovski bicone you just added (the holes highlighted in red on the diagram).

Step 7
Bring your needle up through a hole on the next row (marked in red on the diagram).
Step 8
Thread on:
- 1 size 8 seed bead
- 1 6mm Baby Bell Flower
- 1 size 11 seed bead
Step 9
Missing out the size 11 seed bead, take the thread back down through the Baby Bell Flower, through the size 8 seed bead and down through the same hole.
Step 10
Add 10 more Baby Bell Flowers in the same way.
Add them to the 10 holes surrounding the Swarovski crystals (the holes highlighted in red on the diagram).
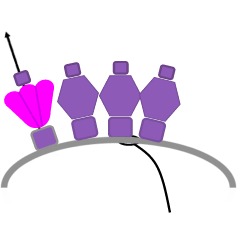
Step 11 - Adding the Leaves
Bring your needle up through a hole on the next row (marked in red on the diagram).

Step 12
Thread on a leaf bead and take your needle down the hole next to the hole you just came up.
Step 13 - Add the Leaves
Miss out a hole and bring your needle up through the next hole. Add another leaf and put the needle back down the next hole.
Repeat around the outer edge adding a total of 5 leaves.
Please note that, because of the number of holes, there will not be a hole between the last 2 leaves. This doesn't really notice when the ring is finished.
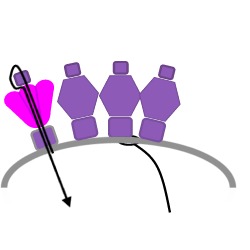
Step 14
Bring your needle up through a hole between 2 leaves. (marked in red on the diagram).
Step 15
Thread on 3 size 11 seed beads and pass the needle back down through the same hole.
Step 16
Repeat in each of the holes between two leaves to give 4 groups of 3 seed beads.
To make sure the leaves are secure take the thread around the outer ring several times going in and out of each leaf bead.
Take the needle off the thread and knot it securely to the thread tail. Trim the ends of the thread to about 1cm.

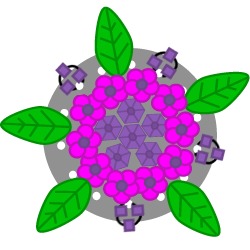
Step 17 - Add the Ring Back to the Sieve
Put the sieve front onto the ring back lining up the little metal tabs on the back of the ring so that they sit between the beads.
With a pair of chain nose pliers gently squash each tab onto the sieve.
This step can be a bit tricky so take your time.
That's it, your ring is finished and ready to wear.